External drives allow you to quickly moves large files between
computers. If you want yours to seamlessly work with both Macs and PCs,
your external drive needs to use a filesystem that is supported by both
platforms. The problem is that by default Windows uses NFTS, and Macs
use HFS. Out of the box, Windows can not read or write HFS drives, and
Macs are unable to write to NTFS drives.
Only FAT32((File Allocation Table)) format is supported by both Mac and PC
.
FAT32 has only a few limitations. Those limitations include the following: All individual files must be smaller than 4GB in size to be able to be copied to this drive, and all file names must follow the Windows naming convention. That is, you can only use the letters and characters that are acceptable when creating Windows files. Apple/Mac allow for some extra characters when creating file names but these extra characters in the file names will not work with FAT32.
WARNING: Any data on the drive will be erased in this process. ? Please backup any data on the drive before proceeding.
Follow these steps to format your drive:
Pros: Works natively with all Macs and all PCs.
Cons: Can’t handle files that are larger then 4GB in size.
Next Best Option could be...
----
Formatting in exFAT
How to format using exFAT (on Windows):
Option 3: Format to NTFS, and use NTFS-3G to read/write on Mac.
If you keep your hard drive's out-of-the-box NTFS format for all the reasons FAT32 displeases, there's a workaround that will allow your Mac to read and write files to the drive. NTFS-3G is an open-source program that, when coupled with MacFuse, will let you use your NTFS drive on your Mac. However, it is an open-source program, so use it at your own risk. Many have vouched for its success, but others complain about bugs.
The commercial solution, which will give you access to support and software updates, is Paragon NTFS. It's $20, offers Lion support, and you get a five-day trial to try before you buy.
Option 4: Format to HFS+, and use HFS Explorer to read/write on PC.
Conversely, you can format the HD to HFS+ and use HFSExplorer for Windows to read and write to the Mac-formatted hard drive. To get started, you'll first have to format the hard drive from NTFS to HFS+. Here's how:
Option5: Create two partitions on your hard drive to use with each OS, separately.
This solution is a little different than the previous two because instead of having one hard drive that works with both machines, you're splitting your HD into two sections, each dedicated to a different OS. For example, if you have a 1TB hard drive, 500GB of storage can be used with your Windows computer, and 500 will be dedicated to your Mac computer.
You won't be able to write to the Mac side from your Windows computer, and vice versa, but it's a good solution for people who want all the advantages each format has to offer for its respective system. Here's how to do it:
With theseall options you'll be able to take advantage of either platform's offerings, be it Time Machine support or security options. In the end, you may end up using FAT32 for its simplicity, but don't say I didn't warn you about the risks.
La moj garnus...enjoy!
Oh additionally know this to na ta....
Only FAT32((File Allocation Table)) format is supported by both Mac and PC
.
FAT32 has only a few limitations. Those limitations include the following: All individual files must be smaller than 4GB in size to be able to be copied to this drive, and all file names must follow the Windows naming convention. That is, you can only use the letters and characters that are acceptable when creating Windows files. Apple/Mac allow for some extra characters when creating file names but these extra characters in the file names will not work with FAT32.
WARNING: Any data on the drive will be erased in this process. ? Please backup any data on the drive before proceeding.
Follow these steps to format your drive:
- On your Mac, connect and power the drive
- Open Mac HD on your desktop
- Open Applications
- Open Utilities

- Open Disk Utility
- On the left you should see the hard drive listed. It should show the drive size with a second indented line beneath it that shows the volume of the drive.
- Click "Erase" at the top of the screen.
- Select MS DOS(FAT) File System for the volume format option.

- Change the name of the drive if desired.
- Click "Erase" at the bottom of the screen. You will get a warning and will need to click "Erase" again.
Pros: Works natively with all Macs and all PCs.
Cons: Can’t handle files that are larger then 4GB in size.
Next Best Option could be...
----
Formatting in exFAT
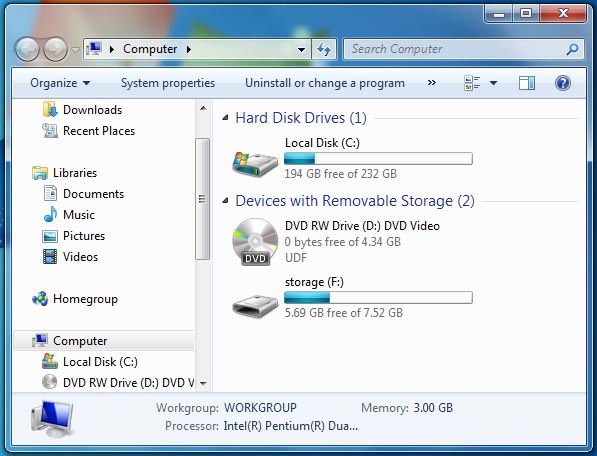
How to format using exFAT (on Windows):
- Plug the disk into a Windows Vista SP1 or Windows 7 computer.
- Open the Computer window.

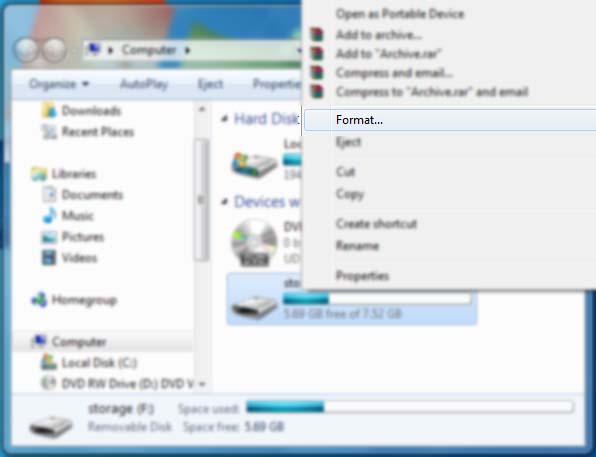
- Right click on the drive, and select Format.

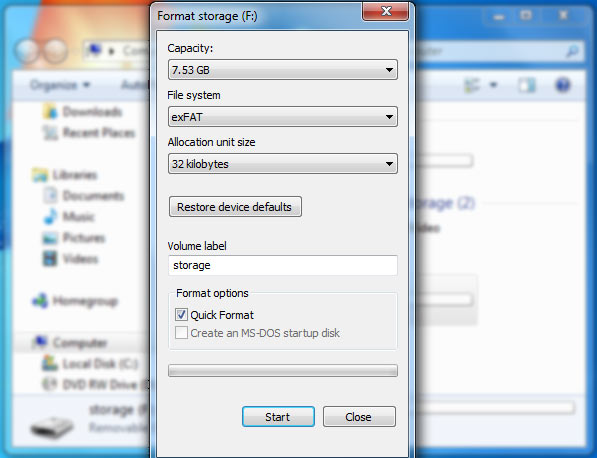
- Select exFAT from the drop down box, and click on Start.

- Done! Now this drive will work with Macs and PCs.
Option 3: Format to NTFS, and use NTFS-3G to read/write on Mac.
If you keep your hard drive's out-of-the-box NTFS format for all the reasons FAT32 displeases, there's a workaround that will allow your Mac to read and write files to the drive. NTFS-3G is an open-source program that, when coupled with MacFuse, will let you use your NTFS drive on your Mac. However, it is an open-source program, so use it at your own risk. Many have vouched for its success, but others complain about bugs.
The commercial solution, which will give you access to support and software updates, is Paragon NTFS. It's $20, offers Lion support, and you get a five-day trial to try before you buy.
Option 4: Format to HFS+, and use HFS Explorer to read/write on PC.
Conversely, you can format the HD to HFS+ and use HFSExplorer for Windows to read and write to the Mac-formatted hard drive. To get started, you'll first have to format the hard drive from NTFS to HFS+. Here's how:
- Plug your HD into the Mac and open Disk Utility,
which can be accessed by searching for it in Spotlight. Then, select
your hard drive from the left sidebar. Now go to the Erase tab. In the
Volume Format list, select Mac OS Extended (Journaled). Then, click
Erase at the bottom to format the drive. Please note that this will complete erase the drive. Any data you want to keep on that drive must be backed up elsewhere first.
Option5: Create two partitions on your hard drive to use with each OS, separately.
This solution is a little different than the previous two because instead of having one hard drive that works with both machines, you're splitting your HD into two sections, each dedicated to a different OS. For example, if you have a 1TB hard drive, 500GB of storage can be used with your Windows computer, and 500 will be dedicated to your Mac computer.
You won't be able to write to the Mac side from your Windows computer, and vice versa, but it's a good solution for people who want all the advantages each format has to offer for its respective system. Here's how to do it:
- Step 1: Connect the empty external HD to your Mac and
launch Disk Utility. Select the drive from the left sidebar, then click
the Partition tab. Under Partition layout, select "2 Partitions." Now,
drag the boxes to adjust the size of each partition. For example, you
might want more storage for your Mac than you do for your PC.
Now, click on the top partition, name it "Windows," and change its format to MS-DOS. Then click the second partition, name it "Mac," and change its format to Mac OS Extended (Journaled). Give your settings a final lookover and click Apply.
Step 2: Plug the hard drive into your Windows PC. Open the Start menu and search for Disk Management. Select the search result and the Disk Management utility will launch. In the left sidebar, you should see your hard drive and its partitions. Right-click the Windows partition and select Format. In the Format dialog box, under File System, select FAT32. Click OK and complete the format process.
With theseall options you'll be able to take advantage of either platform's offerings, be it Time Machine support or security options. In the end, you may end up using FAT32 for its simplicity, but don't say I didn't warn you about the risks.
La moj garnus...enjoy!
Oh additionally know this to na ta....
FAT32 (File Allocation Table)
- Natively read/write FAT32 on Windows and Mac OS X.
- Maximum file size: 4GB
- Maximum volume size: 2TB
NTFS (Windows NT File System)
- Natively read/write NTFS on Windows. - Read-only NTFS on Mac OS X
- Native NTFS support can be enabled in Snow Leopard and above but has proven unstable.
- Maximum file size: 16 TB
- Maximum volume size: 256TB
HFS+ (Hierarchical File System, aka Mac OS Extended)
- Natively read/write HFS+ on Mac OS X
- Required for Time Machine
- Maximum file size: 8EiB
- Maximum volume size: 8EiB